


This tutorial is for someone who built their own room or furniture in IMVU and now want to add a custom animation or pose to it. Everything depends on how you name your nodes in your design program.
If you are unfamiliar on how you should set up your nodes, please visit this tutorial first.
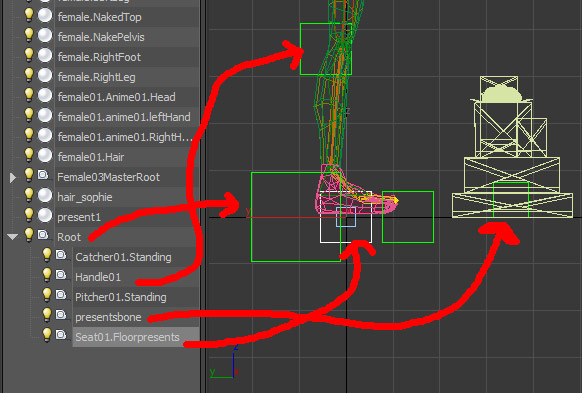
When you are building up your nodes in your design program make sure your default nodes are labeled "seat##.Standing" or "seat##.Sitting" for avatar standing and sitting respectively. For any nodes that will contain custom poses and animations will have to have a unique name, for example "seat05.Jumping" or "seat01.Floorpresents". It is important that the custom name is capitalised. Any additional bones (nodes) that you add for weighing you meshes to do not require any special naming format. Any mesh you would like to animate needs to be weighed to a bone.
When exporting your room or furniture from 3DS Max, remember to export the skeleton first (.xsf) then the mesh (.xmf) and furniture animations (.xaf) as they will need that skeleton to export properly. You export the avatar animation separately and use the avatar skeleton on export.
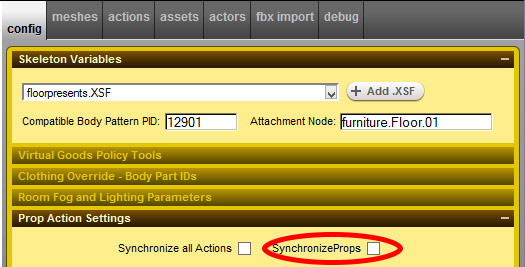
In create mode you will need to import your furniture or room skeleton on the config tab and make sure the prop synch box is checked if your avatar animation and furniture animation need to be synced. Otherwise the two might become out of sync while other avatars interact with your room or furniture.
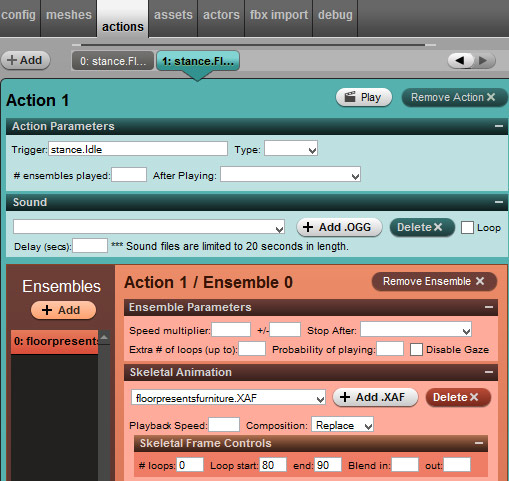
The actions tab is where you will add both your avatar and room or furniture animations. You can have your furniture triggered in one of three ways. You can have it node triggered, key word triggered, or autoplay. Below is the set-up for node triggered furniture and avatar animations, meaning they won't play until you click on a seat icon in client. If you want both the avatar and the furniture to animate on the same node, you still need two separate actions tabs. The avatar animation will trigger using the word "stance.Yournodename" and you need to make sure you add the correct animation file in that tab. The furniture will trigger using the word "stance.Yournodename-seat##". Again you need to make sure you input the correct file. If you don't remember what seat number your node name was, you may have to go back to your design program to figure it out. It is also import to remember to capitalise your node name in both your design program and in create mode.
![]()

For furniture to automatically animate as soon as it is loaded or when you enter a room, you need to add the trigger "stance.Idle" and whatever animation you upload to that tab will play automatically. Again, the word "Idle" needs to be capitalised. Because this is a furniture product, the Idle trigger will only work on furniture items. If you were working on an avatar product, the Idle would only work on the avatar.
I hope this tutorial was helpful. Any questions or comments, feel free to leave them below. I also made a video, but forgot to add the Idle trigger, but it should be useful to watch.